I love Caroline Abbot so much, we have in fact 3 of them, only one is kept "cannon" and the other 2 have been customized. Caroline was released in 2012 as 13th "historical" character in the American Girl Dolls line up, and revamped in 2014 as part of "BeForever" rebranding. She was officially archived in 2015.
There is a small difference between Historical & BeForever Caroline Abbotts though (I've decided to keep the historical Caroline from 2012 as "cannon"), as shown in this video:
American Girl Doll Felicity Merriman Pleasant Company Historical AG Doll
Felicity Merriman is one of our earliest Pleasant Company dolls, from around 1991-1993, representing 1770s Revolutionary War Period, and she's a 4th Historical character released by Pleasant Company in 1991 (when Mattel took over American Girl Brand, Felicity has gone through a number of changes and she's quite different from early Pleasant Company Felicity). The release of Felicity triggered a change in how the early Pleasant Company Dolls were made, changing them from White-bodied to Tan-bodied to allow them to wear lower cut neck dresses. Our Felicity is one of those early "tan-bodied" AG dolls.
Felicity is without a doubt one of my favourite early Pleasant Company dolls with soft eyelashes & "squeezable vinyl"
American Girl Doll Kaya (BeForever) Version was one of the first AG dolls to join our collection. She was originally released in 2002, after Mattel taken over Pleasant Company, she's the 8th Historical character, representing early Native America (1760s) history. Our Kaya is is from 2014:
Here she is having her meet braids taken out:
In 2014, Kaya was part of "BeForever" AG historical dolls revamp, but she remained largely unchanged. You can judge for yourself if there's any real differences between Historical & BeForever Kayas
On our first ever Dolloween, we had fun dressing up our Custom American Girl dolls in Halloween Costumes, and recorded our first ever Halloween video - it's a mixture of stop motion and live action and hopefully you'll find it little bit funny :)
For a very special message to all our fans and subscribers PLEASE don't miss the bloopers at the end :)
Happy Dolloween!
Our Generation RV Camper for American Girl Dolls or 18 Inch Dolls ~ Makeover
Inspired by some lovely pictures of OG Campers from Our Generation / Battat we've seen on Pinterest, we've had a go ourselves to make it a little bit more cheerful.
Our Generation RV Camper Makeover
Curtains
The existing curtains in OG RV Camper are non removable, so to change them, you'd need to cut them off. The new ones I've made are designed to be removed, so you could, e.g. remove them for washing, or have a different set for different seasons!
Finished size 4"x6"
Make 4:
Cut fabric 4.5" x 8"
Fold under 1/4" inch and top stitch the edges to stop it from fraying
Sew on thin strips of velcro (hook & loop tape, I cut it in half lengthwise so it's thinner) at the top end (on the "wrong/back side" of the fabric" 1.5" apart (as measured on the outside) as it needs to go around the rails to hang on
Note - I made new curtains slightly longer then existing ones, and just simply tied them with thin 4mm ribbons
Before : Left Window ~ After : Right Window
Cushions
Make as many as you wish - we've made 6. We used matching fabric and left one of the original pillows. We made our own inserts for the pillows by cutting dress lining fabric - 2 squares 4"x4" for each pillow, and stuffing them with toy stuffing and sewing shut. Pillowcases are removable for washing.
For cushion covers:
Finished Size 4x4" - cut 4.5" x 4.5" fabric square for pillow front, and 4.5" x 6.5" for pillow back (cut into 2 parts at 3.5" & 3"), so you end up with 3 pieces like that:
Turn under 1/4" of the longer side of the two "back" pieces and top stitch to stop it from fraying:
Put the fabrics the right way together - the big square at the bottom, and on the top, the longer rectangle overlapping the shorter one, like so (so shorter back piece is below the larger one):
Sew all the away round (I use 1/4" seem allowance for all doll size sewing), leaving a gap for turning inside out (the right way out). I use a wooden point turner to "finger press it" and push the corners out.
Now you can put the pillow inserts into your pillow cases.
Duvet Cover
To make a cover for the "duvet" that comes with OG Camper, which is roughly 7x13", I cut the 9.5" x 15.5" for the front, and two pieces for the back = 2" x 9.5" and 14 3/4" x 9.5"
It's made exactly the same as the pillow cases, except this cover is "Oxford style" so after turning it the right way out, I top stitched all the way round about 5/8" away from the edge to create a decorative "flap"
Under sink curtains
Just like the curtains, you can't take them off, they need to be cut off. You could leave it as open space, so the shelves show, or add the curtain. The sewing is similar to the curtains - cut 8" x 9.5", top stitch 1/4" under all the way round, and sew velcro / hook & loop tape 1/4" thin along the side 2.5" apart (outside measurement). You may need to use tweezers (or small screwdriver or flat tool) to push the fabric around the rails, it's a bit of a tight squeeze.
Tea Towel
Cut 5 1/4" x 8" fabric, fold in half, right way together. Stitch 3 sides, leave short one open, turn the right side out, and top stitch all the way around, closing the gap.
Table Top Cover
Finished size 5 1/4" x 3.5"
Cut 7" x 5 5/8", fold 1/4" under on short edges and top stitch them, and then fold in half along long edges that are NOT top stitched (right way together) and sew along those two edges only. Turn right side out and slide onto the table. You can also cut a matching piece of fabric to lay on the worktop behind the "table top".
Please do not repost these instructions, but you may link to this post. Thank you!
We have completed setting up our second room in our American Girl Doll House for our American Girl dolls (or of course, for any other 18 inch doll) - the Kitchen. Or more accurately, a red kitchen, featuring Our Generation Kitchen, and Grace's Baking Set.
My crafting contribution to this room so far, apart from the mini bulleting board, was this "Baking" Cupboard", which originally was lined with butterfly paper - you can see it on the left (and we'll use it in another room) - that we got from a local shop. I lined it with a cupcake/kitchen themed scrapbook paper and decoupaged it with ModPodge. I was initially worried, as this was my first time doing it, and the paper all "bubbled up" and looked horrible. But once it all dried up (I did two layers of glossy ModPodge), it looked absolutely beautiful, and feels to the touch like a "wood" rather than paper on top, so I'm really happy with the result!
I decided NOT to buy American Girl Bakery, on the basis that it's too expensive, and by picking and mixing different items from Our Generation and American Girl, we've set up our own 'baking kitchen' for our American Girl dolls, that is now our favourite part of the whole doll house! And you can watch our full "American Girl" kitchen set up & tour in the following video:
I think it's time I start introducing properly my American Girl dolls collection. Over the past several months I've been rescuing TLC (Tender Loving Care) American Girl dolls with the view to restore, fix, and (some of them) customize them, as it's much cheaper than getting a brand new AG doll or one that is in an excellent condition. Some of those dolls are for my children, but some are just for me :D. Here's one of my favourite custom AG dolls...
Michelle, my custom American Girl doll #44 is one of those "just for me" dolls. She came to us in a semi-bad state with some extra furniture I needed for our AG doll house. I could have restored her hair, but I had a spare Cecile wig waiting for somebody special, and I thought it would be perfect for her!
American Girl #44
So I cleaned her up, gave her Cecile's wig and eye swapped her hazel eyes for brown. Michelle was born!
Custom American Girl Doll #44
Cecile wig and eye swapped brown eyes
Custom American Girl doll Michelle in Grace's sightseeing outfit
Her name inspired by Michael Jackson, as I am a huge lifelong fan, and of course, today would have been his 57th birthday, so Happy Birthday MJ, wherever you are ~ You will Always & Forever be in our hearts!
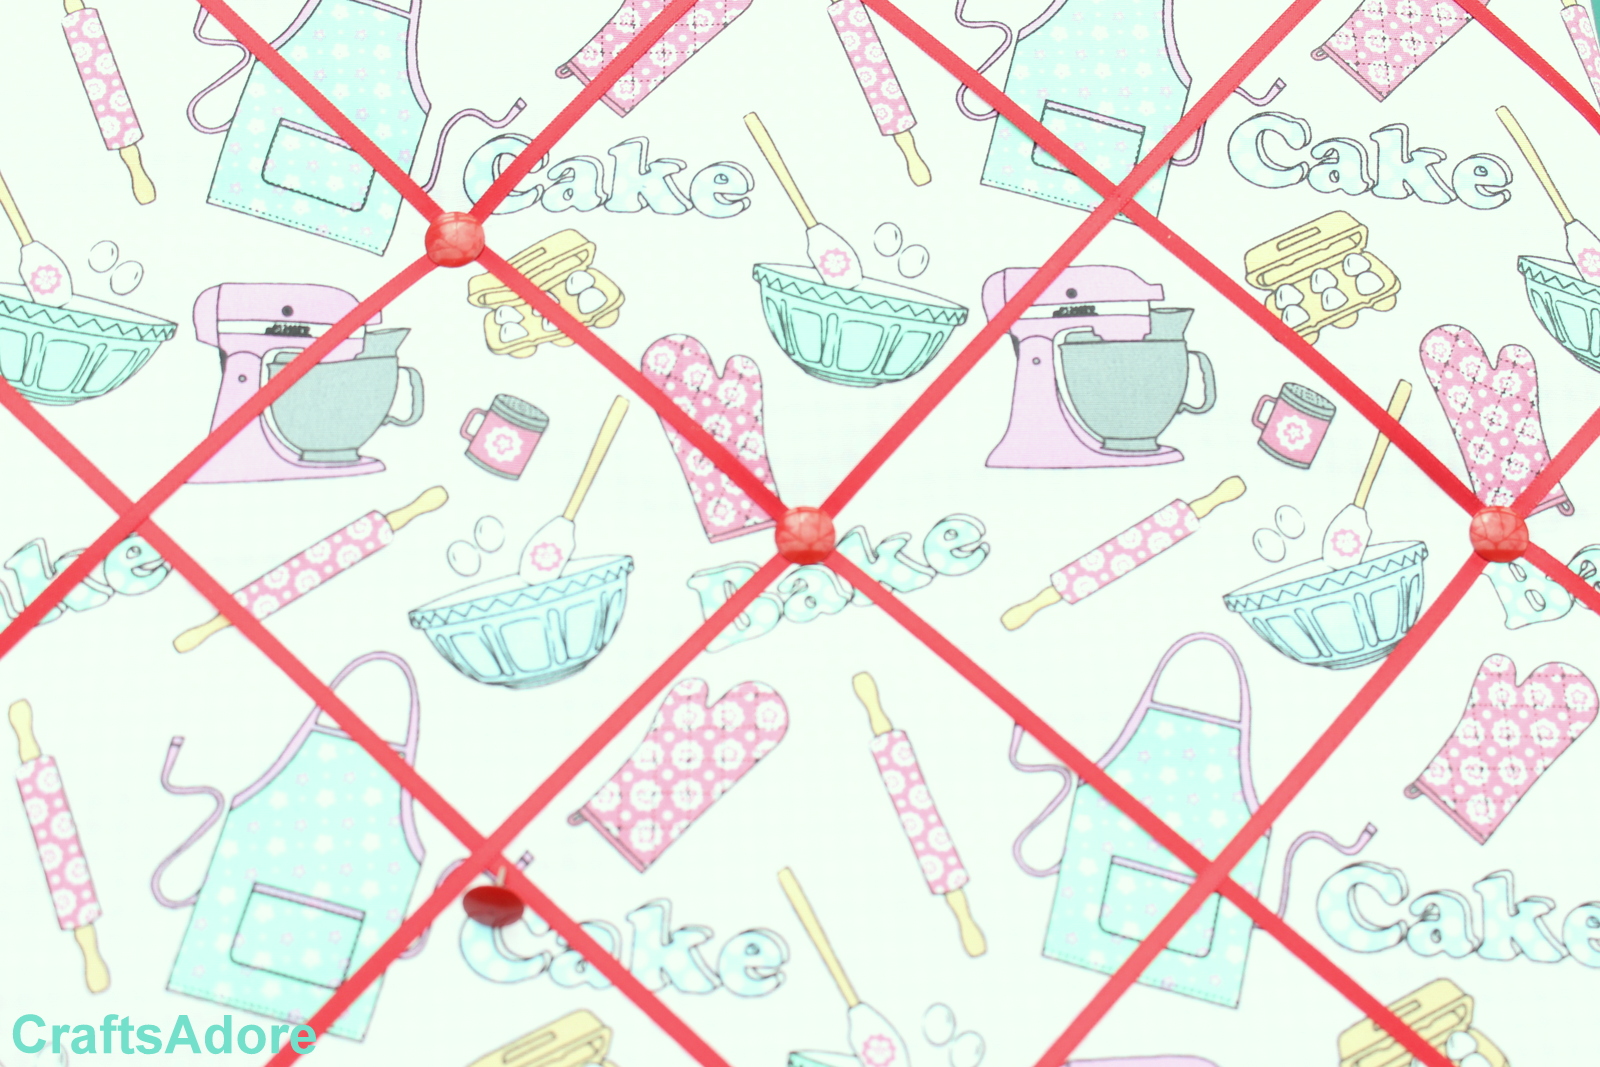
Today I've been making a mini bulletin board for our American Girl doll house. Of course, it can be resized to be suitable for any dolls, not just 18" dolls.
Based on the fabric pattern, I think you can pretty much guess what room it's going to be in....
Supplies for Mini Bulleting Board
I found a pack of 4 self adhesive cork wall tiles 12"x12" in a local shop, and combined it with the fabric, a bit of wadding, and a ribbon, I set to work as follows, but please bear in mind I'm improvising as I've never made a bulleting board before :)
Step 1 Cut the fabric & wadding about 2" larger than the cork board
Cut to size to cover the board
Step 2 Pin or glue the fabric & wadding around the board. I was in luck my boards were self adhesive so the glue was already on the back, but I still pinned it.
Pin it
Step 3 Cut ribbons complementing the colour scheme (I used 4mm grosgrain ribbon in red) and lay it out roughly 2" apart
Ribbons
Step 4. Pin the ribbons on the back of the board, making sure they are taut. I pin all ribbons in one direction, making sure they are spaced evenly, and then in the other, diagonally.
Step 5 Where each ribbon cross, pin a thumb tack in the colour complementing the board fabric (I used red again)
Thumb tacks
Step 6. Pin a little ribbon loop at the top back to help it hang
Hanging loop
Step 7. Step back and admire your very own unique doll sized mini bulletin board:
Finished board
You will get different effect depending how you arrange the ribbons to cross:
In the next post, we'll be setting up the American Girl doll house room for this mini bulletin board to hang in!
Mini Maryellen American Girl Doll joins the household
I pre-ordered a mini Maryellen and mini Josefina AG dolls off Wordery UK a few weeks back and expected them to arrive some time after 28th August. To my complete surprise, they arrived today! Yay! That are so super cute, I just love AG minis:
I've made a custom American Girl doll a few weeks back, to be our Jessie from Toy Story (she was originally MAG #33, with RubyRedGalleria RRG Light Auburn wavy wig, and hazel green eyes). She's currently our stand-in Maryellen, until I decide if I want a big American Girl doll version of her after all :D. Here's a little photo-story of their first meeting:
- Hello, I'm mini Maryellen, I'm new around here. And who are you?
- Well, I'm the big Maryellen of course! I'm surprised you had to ask!
-You're NOT Maryellen!!! You're an imposter!!! Look at you!!! You're nothing like me!!! Your hair is all wrong colour, your outfit is nothing like mine...and WHERE are your side bangs ?!?!
Oh, all right then...I'm Jessie....but can't we just pretend for a bit that I'm Maryellen? Pretty Please???
Oh, OK then, but only till 'mum' decides if the REAL Maryellen will join us or not, you can stand in for her till then, I guess...
Then end :)
And just because we had a little free time on a rainy day, the above photo story has now been converted into mini American Girl Stop Motion video:
American Girl Doll Size Paris Themed Mini Bunting for Grace's Mini Bakery Room
Today, I've completed my first ever American Girl (or 18" doll size) mini bunting to go with Grace's mini bakery room in our AG Doll House. So I thought I'd share with you the steps and the final results, in case you're a complete beginner just like me :D
Step 1. Find the fabric that you'd like to use. I found this Paris-themed cotton fabric in a local Hobbycraft UK store. About 0.5m was enough to ensure all unique pictures were included.
The "postcards" design were just big enough for a mini bunting so I 'fussy cut' each picture out (I did not worry about exact measurements but it's about 3 x 4"). Because of the design, I chose to do rectangular bunting rather than the traditional triangles.
Step 1 Fussy Cut your fabric to include the pattern you want on the mini bunting
Step 2. Pin the cut outs onto the backing fabric, right sides together (or good sides facing each other). This is much faster than cutting the backing fabric to match the front of the bunting!
Step 2 Pin the fabrics facing the right sides
Step 3. Sew around each cut out using 1/4" seem allowance leaving a small gap un-sewn to allow for turning the fabric right way out
Step 3 Sew rights sides together leaving a small space for turning
Step 4. Cut out the sewn bunting and trim the corners, Turn inside out and press flat (I just finger pressed)
Step 4. Cut it out
Step 5. Tuck in the seem allowance in the opening and top stitch all the way around, closing the opened gap
Step 5 Top stitch all the way around
Step 6. Space your mini bunting to your liking - I placed them about 1" apart
Step 6 Decide on your mini bunting spacing
Step 7. I know proper bunting is sewn onto a bias tape, but since it's only a doll-sized mini bunting, I decided to just sew it onto a 4mm wide ribbon using a zig zag stitch. The ribbon and tread were in the color matching the fabric theme (red in my case).
And that's it, the American Girl doll-sized mini bunting was finished, ready to hang in our Paris-themed room for our GOTY 2015 American Girl doll Grace Thomas:
Since our AG Doll house is basically an Ikea PAX wardrobe, and Grace's room is at the top, I could just tie the mini bunting around the top screws. You can see the final result of Grace's room aka Little Bakery / La Petite Patisserie in our AG doll house room tour video: