Showing posts with label Sewing. Show all posts

Wednesday, 23 September 2015

Our Generation RV Camper for American Girl Dolls or 18 Inch Dolls ~ Makeover

Our Generation RV Camper for American Girl Dolls or 18 Inch Dolls ~ Makeover

Inspired by some lovely pictures of OG Campers from Our Generation / Battat we've seen on Pinterest, we've had a go ourselves to make it a little bit more cheerful.
Our Generation RV Camper Makeover

Curtains

The existing curtains in OG RV Camper are non removable, so to change them, you'd need to cut them off. The new ones I've made are designed to be removed, so you could, e.g. remove them for washing, or have a different set for different seasons!
Finished size 4"x6"
Make 4:
Cut fabric  4.5" x 8"
Fold under 1/4" inch and top stitch the edges to stop it from fraying

Sew on thin strips of velcro (hook & loop tape, I cut it in half lengthwise so it's thinner) at the top end (on the "wrong/back side" of the fabric" 1.5" apart (as measured on the outside) as it needs to go around the rails to hang on

Note - I made new curtains slightly longer then existing ones, and just simply tied them with thin 4mm ribbons

Before : Left Window ~ After : Right Window


Cushions

Make as many as you wish - we've made 6. We used matching fabric and left one of the original pillows. We made our own inserts for the pillows by cutting dress lining fabric - 2 squares 4"x4" for each pillow, and stuffing them with toy stuffing and sewing shut. Pillowcases are removable for washing.

For cushion covers:
Finished Size 4x4"  - cut 4.5" x 4.5" fabric square for pillow front, and 4.5" x 6.5" for pillow back (cut into 2 parts at 3.5" & 3"), so you end up with 3 pieces like that:

Turn under 1/4" of the longer side of the two "back" pieces and top stitch to stop it from fraying:

Put the fabrics the right way together - the big square at the bottom, and on the top, the longer rectangle overlapping the shorter one, like so (so shorter back piece is below the larger one):

Sew all the away round (I use 1/4" seem allowance for all doll size sewing), leaving a gap for turning inside out (the right way out). I use a wooden point turner to "finger press it" and push the corners out. 

Now you can put the pillow inserts into your pillow cases. 


Duvet Cover

To make a cover for the "duvet" that comes with OG Camper, which is roughly 7x13", I cut the 9.5" x 15.5" for the front, and two pieces for the back = 2" x 9.5" and 14 3/4" x 9.5"

It's made exactly the same as the pillow cases, except this cover is "Oxford style" so after turning it the right way out, I top stitched all the way round about 5/8" away from the edge to create a decorative "flap"


Under sink curtains

Just like the curtains, you can't take them off, they need to be cut off. You could leave it as open space, so the shelves show, or add the curtain. The sewing is similar to the curtains - cut 8" x 9.5", top stitch 1/4" under all the way round, and sew velcro / hook & loop tape 1/4" thin along the side 2.5" apart (outside measurement). You may need to use tweezers (or small screwdriver or flat tool) to push the fabric around the rails, it's a bit of a tight squeeze.

Tea Towel

Cut 5 1/4" x 8" fabric, fold in half, right way together. Stitch 3 sides, leave short one open, turn the right side out, and top stitch all the way around, closing the gap.

Table Top Cover

Finished size 5 1/4" x 3.5"
Cut 7" x 5 5/8", fold 1/4" under on short edges and top stitch them, and then fold in half along long edges that are NOT top stitched (right way together) and sew along those two edges only. Turn right side out and slide onto the table. You can also cut a matching piece of fabric to lay on the worktop behind the "table top".


Please do not repost these instructions, but you may link to this post. Thank you!
You can watch the final result on our channel:


Saturday, 22 August 2015

American Girl Doll Size Paris Theme Bunting for Grace's Mini Bakery Room

American Girl Doll Size Paris Themed Mini Bunting for Grace's Mini Bakery Room


Today, I've completed my first ever American Girl (or 18" doll size) mini bunting to go with Grace's mini bakery room in our AG Doll House. So I thought I'd share with you the steps and the final results, in case you're a complete beginner just like me :D

Step 1. Find the fabric that you'd like to use. I found this Paris-themed cotton fabric in a local Hobbycraft UK store. About 0.5m was enough to ensure all unique pictures were included.

The "postcards" design were just big enough for a mini bunting so I 'fussy cut' each picture out (I did not worry about exact measurements but it's about 3 x 4"). Because of the design, I chose to do rectangular bunting rather than the traditional triangles.

Step 1 Fussy Cut your fabric to include the pattern you want on the mini bunting

Step 2. Pin the cut outs onto the backing fabric, right sides together (or good sides facing each other). This is much faster than cutting the backing fabric to match the front of the bunting!
Step 2 Pin the fabrics facing the right sides
Step 3. Sew around each cut out using 1/4" seem allowance leaving a small gap un-sewn to allow for turning the fabric right way out
Step 3 Sew rights sides together leaving a small space for turning


Step 4. Cut out the sewn bunting and trim the corners, Turn inside out and press flat (I just finger pressed)
Step 4. Cut it out
Step 5. Tuck in the seem allowance in the opening and top stitch all the way around, closing the opened gap
Step 5 Top stitch all the way around
Step 6. Space your mini bunting to your liking - I placed them about 1" apart
Step 6 Decide on your mini bunting spacing

Step 7. I know proper bunting is sewn onto a bias tape, but since it's only a doll-sized mini bunting, I decided to just sew it onto a 4mm wide ribbon using a zig zag stitch. The ribbon and tread were in the color matching the fabric theme (red in my case).


And that's it, the American Girl doll-sized mini bunting was finished, ready to hang in our Paris-themed room for our GOTY 2015 American Girl doll Grace Thomas:

Since our AG Doll house is basically an Ikea PAX wardrobe, and Grace's room is at the top, I could just tie the mini bunting around the top screws. You can see the final result of Grace's room aka Little Bakery / La Petite Patisserie in our AG doll house room tour video:


Sunday, 5 April 2015

American Girl Dolls as all 13 Disney Princesses ~HD~

American Girl Dolls as all 13 Disney Princesses ~HD~

For the past couple of months I had lots of fun customizing our American Girl Dolls to look like Disney Princesses. In a house full of girls, pink is prevailing, but I was surprised how colourful the Princess collection ended up looking, with very little pink indeed!

I started with Anna and Elsa, because we absolutely adore Disney Frozen move. Then I moved on to see how many others we can make to look like Disney Princesses, because we also love all original Disney Princess movies, as well Once Upon a Time TV series and of course the latest Disney Cinderella movie!

There is 13 official Disney Princesses as of spring 2015, and here's the final result (click on the picture to view the full video). I hope you enjoy it!
My American Girl Dolls as Disney Princesses
P.S. Don't forget to leave us a comment and subscribe to our channel for updates on forthcoming videos :)

Wednesday, 23 July 2014

Sewing Patchwork Baby Blanket

Sewing Patchwork Baby Blanket

I decided to learn some patchwork. As usual, I don't start with easy projects - I seem to make my life difficult and go for the more difficult or advanced patterns, not for a beginner. Oh, well. I really fancy learning to sew a start-type patchwork, for my little star. I drew up a patter on a paper, did some measurements and off I went - the result was a patchwork star, albeit not a perfect one. In my eyes, it was perfect. The size of the block was about 16", and I padded it up with some cabin log style patchwork around it. I used up about 4 fat quarters (with lots of leftovers). I cheated a bit in terms of quilting it, as I used some old blanket to put this cotton patchwork block on top of it, and just quilted around the edges.
Sewing Patchwork Baby Blanket
 He was more than happy, throughout the winter, in his pushchair, covered with his star patchwork blanket.
Sewing Patchwork Baby Blanket

Sunday, 20 July 2014

Sewing Patchwork Pillowcases

Sewing Patchwork Pillowcases

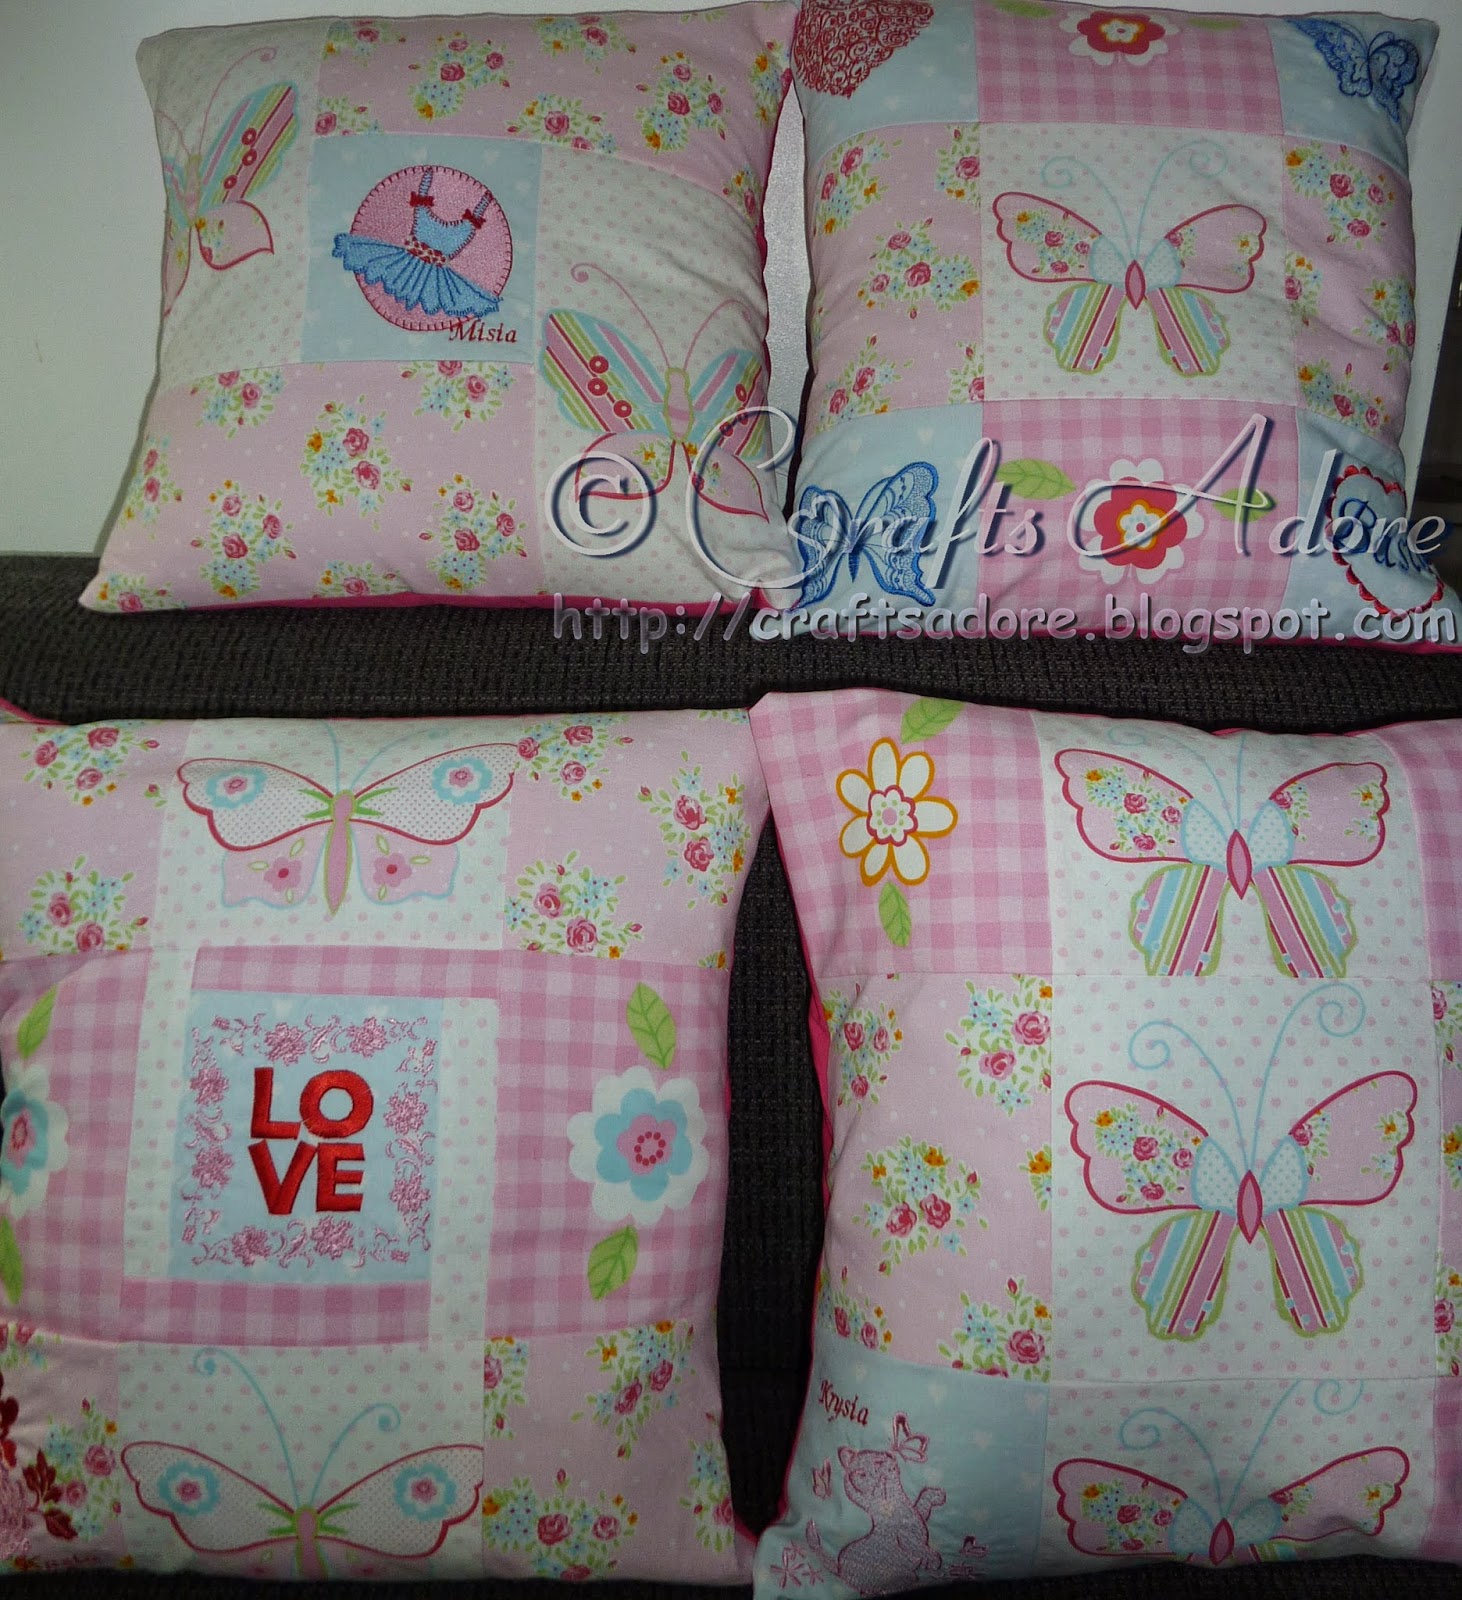
What is the best sewing project to start learning sewing on - pillowcases of course! But I did not want to do just any "old" pillowcases - I decided to make personalised patchwork pillowcase for each of my daughters. I got a meter of fabric from a local fabric store (I think this butterfly design is by Clark & Clark). The fabric was already in "patchwork" style, but I cut it up, and it was just enough to make these four pillows, and I used plain pink fabric for the backing. I did not follow any particular pattern - just fitted the pieces to fill layout to make a patchwork square to fit the pillow size. Each pillowcase was embroidered with their name and a chosen picture (a perfect excuse to try out my birthday present - Laura Ashley Brother Innov-is 2200 sewing / embroidery machine). I think I'd have trouble picking my favourite pillowcase now -they all turned out to be unique, just like their owner :)
Sewing Patchwork Pillowcases
Same fabric, different results
Sewing Patchwork Pillowcases
Pretty Ballerina

Sewing Patchwork Pillowcases
Pussy Cat & Butterflies

Sewing Patchwork Pillowcases
All you need is LOVE

Sewing Patchwork Pillowcases
You can never have too many butterflies. Or Love Hearts.


Thursday, 17 July 2014

Sewing Little Girl Dresses - With Sleeves

Sewing Little Girl Dresses

After having learned to sew some soft toys, and a simple pillow dress, I've decided to learn to sew dresses. Since I did not want to waste expensive fabric, we went to a thrift shop and got some double bed covers - there's plenty of fabric to learn to sew from that and the fabric pattern look interesting to be made into a dress. The dress pattern was from Simplicity range, and the dresses are made from largest size 6 and size 4, to fit my two middle daughters. Don't they look cute in their matching dresses?
Sewing Little Girl Dresses
Pretty in Pink

The pattern was easy enough to follow although I had to refer to YouTube for instructions on sleeves easing - that bit took me the longest. I finished the dresses off with some decorative stitching and ric rac ribbons, in pink of course. I'm not sure I would let them out in a real world in these dresses but they're more than perfect for garden play. Next time, I may be brave enough to try "proper" fabric....in fact I think I may have to learn to do a prom dress pretty soon.

Tuesday, 15 July 2014

Sewing Prom Dress from Free Dress Sewing Tutorial

Sewing Prom Dress from Free Dress Sewing Tutorial

I still consider myself a sewing beginner. I can count the number of dresses I have made so far on only one hand. But, my oldest DD was not discouraged by my lack of experience - she asked me to sew her a prom dress. OK so it's not a "real prom", only graduating from the primary school, but at this age, any excuse to dress up is good enough.
Sewing Prom Dress from Free Dress Sewing Tutorial

I was really struggling to find any suitable easy dress patterns online, and time was quickly running out, so we started to panic. Shop-bought dress was not an option. Fortunately, as if by heaven's intervention, this tutorial from SewMammaSew landed in my Facebook page news feed - perfect! This was exactly what I had in mind. Although it is not exactly a prom dress tutorial, more like a baby doll twirl top, it is easily adaptable and can be made into a dress.

I followed the sizing for 9-10yrs old but adapted it as follows - bodice was 16" instead of 8", and skirt length was 36" and 30" wide (as that's all I had in the fabric). I did not have Clover gathering tape, so used normal gathering stitch on the sewing machine. I have also added a 3" wide belt, made from the same fabric. I don't know what type of fabric it was, as it was a bargain find in a thrift shop, but it measured 60" by 59" and it was just enough to make this dress.
Sewing Prom Dress from Free Dress Sewing Tutorial

Before I attempted the "real thing", I made a trial run with some spare cotton fabric first - so in the end she ended up with 2 dresses - one casual and one special occasion. They each took about a day to make.
Sewing Prom Dress from Free Dress Sewing Tutorial

I think she's pretty happy with them both, but looked particularly stunning on her actual prom day.


So if you're new to sewing, try this pattern - I am really happy with the result, and the baby doll twirl top pattern is perfect to adapt and adjust to your own measurements (and even make it into a prom dress :) ) and the instructions are easy to follow. And I especially love that there is no sewing zips or buttons - I am yet to attempt any patterns that involve zips.

Sewing Little Girl Dresses - Pillowcase Dress Style

Sewing Little Girl Dresses - Pillowcase Dress Style

Originally I bought this cotton fabric to sew something for my little boy's room, but it seemed too girly to me, and not blue enough, so I decided to turn it into a dress. Since it was my first ever attempt at sewing a dress, I went for the simplest possible dress pattern - pillow dress style - from Simplicity patterns. You can, however, just follow some free tutorials available on the web to achieve the same (and probably simpler). In fact - I made another pillowcase dress style after that one, following the patchwork dress tutorial found here - highly recommended!

Sewing Little Girl Dresses - Pillowcase Dress Style
I'm quite happy how it turned out, although it is rather short now for her, but can easily be worn as a long top or with some leggings.

Friday, 6 June 2014

Tilda Studio Angel

Tilda Studio Angel

This Tilda Studio Angel is one of the biggest Tilda Doll patterns in the Tilda books (although of course you can photocopy and enlarge it for your own personal use). I ended up making two so far - one for the corridor where it "watches" over us, and greets all the visitors, and one for my daughter's bedroom - she likes green. All made with Tilda fabric, because it's a perfect fit.

Tilda Studio Angel Soft Toy
My Corridor Tilda Angel

Tilda Studio Angel Soft Toy
Someone to Watch Over Me

Tilda Studio Angel Soft Toy
Green Glorious Green
Tilda Studio Angel Soft Toy
Enjoying Tilda Fabric Stash


I love this Tilda Studio Angel design because by simply changing the hair and the dress colour, you can adjust it to the recipient's personal preferences or the room colour scheme (my corridor decorations are mainly red). Also, because the dress is actually part of the body, this Tilda Angel doll does not require much skin fabric.

And I love the fact that even though Tilda Angels have no faces (which by the way is perfect for beginners as you only have to mark some eyes with a fabric permanent marker and use some lipstick for cheeks), they do seem to be happy and cheerful.

I'm definitively going to do more Tilda Studio Angels, but next time maybe different hair as I seem to be going for blond all the time. And I do try to put different wings on them every time I do them to see which ones I like best.

* Tilda Studio Angels patterns can be found in Tone Finnanger's Tilda's Studio book, highly recommended!


Thursday, 5 June 2014

Tilda Sewing Angel

Tilda Sewing Angel

I love this Marylin Monroe-inspired Tilda Angel. It's called a Sewing Angel, designed by Tone Finnanger, and it was made out of a kit. Although I ended up using a book pattern because there is actually some size difference - the book pattern is a bit bigger than the one included in the kit, and if I'm spending all this time sewing a Tilda doll, I might as well go for the big one.

And let's face it - any sewing room needs a Tilda Sewing Angel to watch over it, so naturally I had to make one!
Tilda Sewing Angel
My Sewing Angel to Watch Over Me
Tilda Sewing Angel
Call me "Bed Hair" Tilda Angel
The kit contained all the fabric for the skin, dress, wings and blanket and some die cut outs for the sewing machine, as well as the Tilda hair and the two wooden bobbins. Plus all the bits you need like glue, embroidery floss, sewing thread and needles, which I ended up not using, as I already had some own stash. I found the instructions ok, but since I had the book as well, I followed both.

This project was only my second Tilda Angel attempt - the first one was not so good, made from some scrap fabric, as a trial run, so I can't really post it here :( - but all was not lost as it ended up being a play toy for the younger daughter. In fact, I did the dress from her old baby dress, so it ended up being a treasured keepsake...

This second attempt at the Tilda Sewing Angel turned out almost ok. The only thing I was not happy with was the hair. I kept doing it several times, but it kept looking awful, so in the end I just arranged it and messed it up randomly - I guess I should call it a Tilda Sewing Angel with "bed hair".

I love the Tilda skin fabric though - it seems different, more stretchy, than normal cotton. It seems dark, especially when compared to the calico that I have been using on other Tilda dolls. But it's relatively expensive per meter, so I have cheated a bit, and cut the pattern in such a way that I managed to make another Tilda Studio Angel out of it.

* Tilda Sewing Angel pattern can be found in Tone Finnanger's Tilda's Spring Ideas book, highly recommended!


Tilda Cupcake Angel - The Best Diet Advice Ever

Tilda Cupcake Angel

Most of Tilda dolls I make are tall and slim. But in real life, as much as we strive to be like a Tilda doll, it is not always the case.

Luckily I found the best solution to my nightly fridge raids - I've made a Cupcake Tilda and stuck it on the fridge!


This voluptuous Cupcake Tilda designed by Tone Finnanger is now proudly stuck my fridge with a cleverly hidden magnet under her dress, constantly reminding me what happens if I keep on snacking.

It's a very quick make, just about a couple of hours, and a perfect sewing project for a beginner. The dress is also easy to sew - in the book this Tilda Cupcake Angel has a felt dress, to stop it from fraying. However, I decided to do it in a Tilda fabric, so ended up struggling a bit with doing seems on the very small sleeves opening. The pink gingham wings are actually made from an old baby dress from one of my daughters, so it also acts as a "keepsake".

* Tilda Cupcake Angels patterns can be found in Tone Finnanger's Tilda's Studio book, highly recommended!


Wednesday, 4 June 2014

Tilda Bunny Soft Toy

Tilda Bunny Soft Toy

My kids requested a Tilda bunny soft toy. Each. That's a lot of bunnies to make in one go...

I love everything Tilda by Tone Finnanger. However, the bunnies are not my favourite Tilda toys, they way they are presented and dressed in her books.

So I had to dress them up a bit in "made up" dresses, all using Tilda fabric, of course, and some handmade crochet flower "headbands". But that's the beauty of Tilda designs - you can make them your own, and each time they will turn out completely different. It took a whole Sunday of sewing (I'm still learning) but they turned out better than I expected :).
Tilda Bunny Soft Toy
Sisters by Birth, Friends by Choice
Tilda Bunny Soft Toy
I like to dress up
Tilda Bunny Soft Toy
I like to be comfy
Whilst Tilda bunnies are fun to make, there is a lot of hand stitching involved, especially around the limbs and ears.  I've had enough after two bunnies, so three more are currently waiting to be done in a half-done state.
Tilda Bunny Soft Toy
We need clothes!!!


* Tilda Bunny Soft Toy pattern can be found in Tone Finnanger's Crafting Tilda's Friends book, highly recommended!